1) Go to Create panel tab

2) Type in all the required data:
- Name — desired panel’s name. You can change it later from the panel’s admin cab;
- Domain — domain name you want the panel to be at. You need to own the domain. If you're going to purchase a domain name for the panel, please do it beforehand;
- Admin email — e-mail address of the person to be the panel’s Administrator;
- Admin password — password of the abovementioned Administrator’s account. This password doesn't need to match your Socpanels account's password;
- Password confirmation — type the password again.
Then you need to choose a tariff plan in the calculator. Our pricing is based on the panel’s turnover. Please choose a plan that suits your expected revenue. Don’t worry if you are unsure — when your sales exceed the limits of the chosen tariff plan, it will be updated automatically.
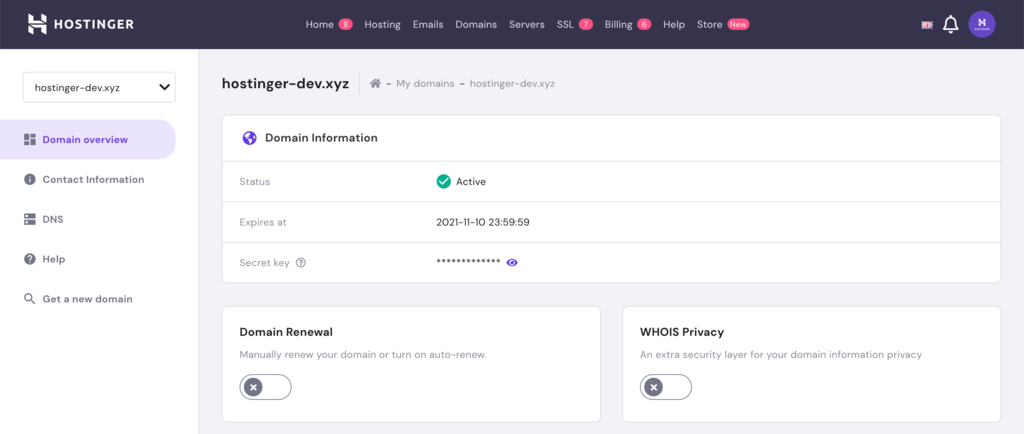
3) Go to your domain settings at your registrar and change nameservers to the values listed on your panel’s Overview page

It may look different depending on your registrar, not exactly like on the screenshots below, but the typical steps are listed here.
- Login to your domain name registrar. This is the place where you bought your domain.
- Look for the option to set your domain’s nameservers. Every registrar has a different way of doing this. However, in general, you can find the appropriate settings on the menu called Domain Management, or Domain Settings, or something along those lines.
- Go to [your domain name] —> Manage DNS. Select the Use my own nameservers option.
- You should see several fields, such as Nameserver 1 (primary nameserver), Nameserver 2 (secondary nameserver), that will most likely be filled with your hosting provider’s default nameservers.

- Enter the nameservers into the appropriate fields. For example, a nameserver that begins with ns1 should be put into the Nameserver 1 field, if it starts with ns2 to Nameserver 2, and so on.
NOTE: If you see the Create child nameservers field, you can ignore it.
Keep these tips in mind should there be any difference between the number of nameservers and the number of available fields:
- If your registrar provides you with four or more fields, while you need to change only two, enter the needed two, leaving the other ones empty.
- Your registrar may additionally ask for your consent to change the domain’s DNS settings.
Try to look for the registrar’s Help or FAQ page if you still cannot find the menu to set your nameservers.
Socpanels automatically checks your domain’s DNS every few minutes, but you can click the RE-CHECK NOW button in order not to wait. Keep in mind that changes may not take effect immediately and you may need to wait for a few hours.

When the settings change, you’ll see it in your panel’s overview. That’s it. Your panel will be active and accessible on the selected domain after your first payment.
After payment, your panel is activated. To speed up the activation process, feel free to contact us via live char or via support@socpanels.com

As soon as your panel is activated you will have access to the admin cabinet. To get to this cabinet you need to click the button “Admin area”.

On this page you will see the main menu of the panel.